Saturday, August 27, 2011
Module construction
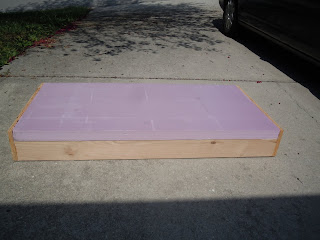
We've (kids+me) made two 2' x 4' frames (well, 2' x 4' 1.5" frames). We used the Free-mo N suggestions: 6" high by 24" wide 3/4" birch plywood end pieces, then the same plywood but 4' long by 4" wide for the side boards (thus the overall 4' 1.5" length: we could use two 2' x 4' plywood boards and minimize cuts). Glued and screwed (using a Kreg jig) the frames together. Before this assembly, clamped the two endplates that would touch together, then drilled two holes, each of one inch diameter, on either side of the midpoint so that wired could pass between (Free-mo N doesn't do this, and instead runs wire under module ends). To help alignment between the two sections, each has two 5 mm diameter metal pegs that fit into complementary holes in the other module. Many of the deviations from Free-mo suggestions come because I want to be able to slide the modules together on a table or shelf and so there won't always be room for attaching a C-clamp (though the modules are made so this is possible). Each module also has eight felt feet underneath so they can be put on various surfaces without damaging them (you can see them in the photos elevating the module above the driveway). I have also attached the pink foam for the surface (attached using Liquid Nails for Projects, though they're a flush fit to the end pieces).
Overall, this is coming out neater and stronger than I expected. The one thing I've noticed is that I find a 2' x 4' module awkward to carry if it is to be kept level: reaching under to hold the opposite side doesn't feel secure, nor does grabbing the end pieces. I'm sure with practice it will be better.
Friday, August 26, 2011
Painting foam
Pink or blue extruded foam insulation has become popular for model railroads: lightweight, fairly rigid, easy to shape. Following Free-mo N suggestions, my layout modules were to be covered with 2" of foam. I bought a 4' x 8' x 2" sheet at my local home improvement store (the greatest advantage of living outside of California is that such foam is once again readily available). I found that the sheet would not fit in our minivan (at least, not without removing several child car seats to allow the van seats to be dropped down), so it was back to the store for a saw. Fortunately, the foam I got was scored on its center line, so deepening the cut and then snapping the foam went well.
Many model railroads spend an extended time in the "Plywood Pacific" stage: track down, railroad operational, but no scenery, just the wood/foam/homasote/etc. supporting the track. Since I'll be doing winter scenery, I thought that I could paint the foam white before track laying: far from finished scenery, but less jarring to the eye than bright pink during the Plywood Pacific stage. I thought that I could just quickly spray the foam with white spray paint before using it.
I knew that foam was sensitive to various chemicals, thus the common advice in the model railroad press to use foam-safe adhesives. So I was careful to buy spray paint intended for plastics, even noting that polystyrene is listed on the label as one of the plastics it was safe for. A few seconds after starting to spray the foam, it became apparent that the paint might be great for plastics, but not this foam. The foam kept bubbling and was gradually being eaten away. I wiped off the paint. You can see the results below (zoom in on the right). Basic moral: use acrylics/latex. Less noxious and won't eat your benchwork.
Subscribe to:
Comments (Atom)


